Showing posts with label tutorial. Show all posts

Monday, 19 January 2015

Magic dough.

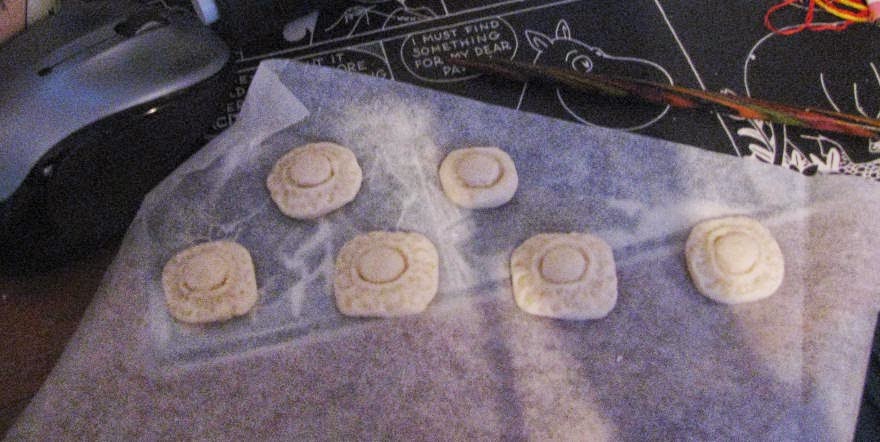
Fresh from the oven. The holes collapsed a little while baking...
I randomly came across an old friend while looking for something entirely different: taikataikina, magic dough. This stuff is what a large part of my childhood was made of. It's easy to make, the ingredients are cheap, definitely non-toxic, fun to work and the dough dries/bakes completely hard. It can then be painted, glued, filed etc. whatever you feel like doing with it - or you can mix some food dye into the dough before working it.

Recipe:

0,5 dl salt
1 dl wheat flour
0,5 dl water
1 tsp oil

Mix salt and flour together well. Add water, mix, add oil, mix. If you want to use food dye, add it now. The dough is ready for working! If it still feels sticky add a bit of flour, if it starts to crack add a little water. It's quite soft when ready, a bit like gingerbread dough.

Nipnops in the making? :D
Tips: it's good to rub a bit of cooking oil into your hands before working to avoid extra stickiness. The best tools I found were made of metal or wood, such as knitting needles and sewing needles. The dough dries if you don't keep it covered but it won't do it too fast, you'll notice when it's time to put the lid on. If you're making imitation food you can coat the pieces with egg just as if you were baking normally, it'll create a yellowish, warm glaze.

Once done let the items dry in 125°C oven for about an hour. If your items are on the larger side keep them in for a bit longer. Ready for paint/whatevers!


Friday, 26 September 2014

LBC: My Usual Lolita Make-up.

I'm 35.

I can't lie and pretend it doesn't show, because it, well, does. My skin is no longer as smooth as it was 10 years ago, my eyes are getting that weird sunken look typical for the women of my family and the lines are getting deeper (although to be honest I've had lines on my face since I was 13, one of the curses of dry skin). Doing my lolita make-up the same way I did it when I was in my 20's would be the worst mistake ever, because some things that a younger face can pull off will make my 35 years look 40. Well, that probably still wouldn't matter in daily life BUUUUT when it comes to lolita I want to avoid that, even if thinking so is shallow and vain. So here's this week's LBC entry on the theme of "My Usual Lolita Make-up".

Note that this mostly works for my own face and that your face will make demands of its own, so this won't be a proper tutorial I'm afraid... but if any of this is helpful to you then I'm happy! 


Apologies for the photo quality. :P

Anyways, my problem areas are as listed:

1. Dry forehead, an occasional pimple and wrinkles.
2. I'm getting slightly droopy above the eyelids. If I'm lucky with the gene lottery this will never become too bad a problem.
3. Massive black bags under eyes, especially in the mornings. They give me a gaunt look, which is not flattering.
4. Lines from my nose to the sides of my mouth.


I had to do the make-up extra thick to make it show properly in the photos so apologies guys I don't usually spread my make-up with a shovel! Arrows mark where I've put some lighter colour. I also have all the base works done underneath, save powder.

Anyway, I've found that using yellow tone in these areas works the best for me. My skin's kinda blue by default and it cancels out a lot of that.


Blending in the yellow pen, adding mineral powder. I have to use the lightest shade because I'm whiter than mayo where I'm not blue.


Blush goes here and in this shape, not under my cheek bones. I've got sharp features though the lack of light in our bathroom both softens my face and makes it super yellow (mum calls my face type "axe-cut"). Putting blush to the sides of the face will make me look really skeletorish, which is not a good look in lolita though it can be used for an intimidating "don't bother trying me"-look for partying downtown.

At this point I put on my beloved clip-on fringe so don't be surprised to see my hairstyle entirely change.


I only use pencil eyeliner for lolita. Liquid makes my features too sharp and mean. Possibly due to all those sharp angles I have a resting bitch face, so I have to keep that in mind when putting on lolita make-up and try to make myself look more... harmless. Or at least less like I'm about to bit the face off of the first person who talks to me. :D

My cam really captures the yellow here but I'm adding photos taken outdoors to the end of this post so you'll see how the make-up looks in natural light. I PROMISE IT'S AT LEAST LESS YELLOW HONEST HONEST AAAGH.


1. I don't have mascara on yet here so you can see how I actually curve the eyeliner down at the corners of the eyes, it gives a kind look.

2. I like to go over the eyeliner with eyeshade to make it look even softer. I use a dark shade directly over it, light shade over the lid and lightest shade above it. My eyes are really deep-set so I don't always add dark eyeshadow to the crease of the eyelid because it's kinda unnecessary.


1. I don't line my eyes below or wear fake lashes unless I'm going to have a photoshoot. When over 30 everything extra on the face is a minus, keeping the make-up as natural, simple and light as possible is the way to go. I do put mascara on the lower lashes though.

2. I don't always curl my lashes either. They turn down naturally which gives a kind look and works with the eyeliner. I would curl them for fake lashes though because lol @ double lashes.

3. Ok this might sound hilarious but I brush my eyebrows. :D They're bushy and unruly but I like them thick, so I try to pluck them minimally and just make do with other means.


As for lips I first line and fill them with a neutral tone lip pencil. I like going just a little bit over the lips.


Powder goes on next.


Then I apply lipstick but not to the whole lips. I apply a lighter shade on a larger area and use darker in the middle, makes them look soft and plump.


Cover with lip gloss and done!


***


Here's how it looks like in real light outdoors.


Annnd the other side.

Other blogs partaking in this theme:


Thursday, 18 September 2014

DIY apron skirt.


An apron skirt is a really easy and fast to make project, and as such ideal for a beginner seamstress. I hope the above pic gives an idea of what exactly is an apron skirt - it's open at the back, tied around the waist like an apron and meant to go over another skirt.


This particular one is as simple as they come. Every piece of it is just a rectangle so no patterns are needed to make it. The above photo should give some idea of how much fabric it takes to make one, which is not very much at all (the yellow thing is just a regular measuring tape).


Cutting done. From bottom to the top the pieces are 2x ruffle piece (= at least twice as long as the skirt part to create a proper ruffle), 1x skirt piece, 1x waist band cut to the length of the wearer's waist circumference annnnd... the last one's in actually two pieces but was I smart enough to show that in a photo? No. Imagine, however, that the top rectangle is cut in two equally long pieces that will become the apron's apron strings. You can make longer ones too if you like. :)

The heap of fabric right at the top is the extra material left over. Nevermind the heap.

Length: there's no good rule to how long the pieces have to be, but here's some ideas. The ruffle and skirt parts added together should come to 45-55cm length, which imo is ideal for lolita. The waist band has to be minimum 10cm wide because it will be folded in half when attached, same with the waist ties. If at all possible add 2cm to all measurements for seam allowance.


Zigzag around all edges, or serge if you own a serger.


Sew the middle seam/s of the ruffle.


Fold waist ties in half and sew as shown above. Cut the corner as shown, turn around. You may use a knitting needle or some other tool to poke out the corners tidily.

You'll probably notice I didn't zigzag these pieces... it's cause I'm lazy and these particular seams will end up securely pocketed once the waist ties are turned around so it doesn't actually matter.


Ironing time! Iron all seams open (and always do this with seams because it makes everything so much neater-looking and easier to sew).


Fold the side and bottom edges of the ruffle as shown above, same with the side edges of the skirt part, iron in place. This will make stitching it tidily so much easier, especially if you plan on adding lace to the ruffle.

Fold waistband in half lengthwise and iron tidily.


Waist ties need flattening too. The one on the right has not yet been ironed, the one on the left is ready to be stitched.


Stitch around the waist ties a few millimetres from the edge. Also stitch the sides of the ruffle pieces and the skirt, if not adding lace to the ruffle you can also just go ahead and stitch the bottom.


If adding lace, pin it to the ruffle securely.


I would then go on and stitch around the bottom edge of the ruffle from the right side, careful to pull out the pins and not sew over them because that may break or bend your needle.


Ruffling time! Baste along the top of the skirt piece and the top of the ruffle as shown, ideally use a thread that's very different colour than your fabric. There are other ways of making ruffle, most notably this one*, but when dealing with thick material like the one used for this tutorial hand basting actually is far more reliable a way of creating the ruffle. When done, pull the thread gently and gather the whole thing up in a ruffle.

* The tutorial uses ruffle that's folded lengthwise in half but that part's not necessary. In fact a lighter, airier ruffle suits lolita style better.


Spread the ruffles evenly and pin the ruffle to the bottom of the hem part. Sew to attach. Do the same with top of skirt and waist band.


Iron the seams open again, press nicely flat on the front side. Stitch over ruffle top and skirt+waistband joint as shown above.


As a final step attach the waist ties. I simply folded the to-be-attached end over, pinned it in place and sewed over it twice.


Finished item with a matching gigantic head bow.


Hem detail.


Detail shot of the back and the waist bands.

And here's how an apron skirt looks when worn:


Front - the skirt underneath can peek from below although it's not necessary - with this type of overskirt both ways look correct.


Back. This is the reason why you always need an underskirt that's not just a petticoat - apron skirt flares out a lot and opens in the back. They're meant to. It's part of what makes them so cute.


Aaaand a quick shot of the gigantic headbow. :3


Wednesday, 5 March 2014

Rescuing a ratty hair extension.

Today is called öskudagur here in Iceland, and children will be going around dressed up in costumes, gathering candy from the stores. This is naturally a great season for flea market hunting because it's like they stock up for it. They probably don't but somehow they still had tables and racks full of costumes and materials a cosplayer or a lolita will easily find usable!


#1 find, this greasy, disgusting bunch of tangles. Regardless it seemed to be of good quality and therefore salvageable.


That's not to say it would be easily done though! It had so many knots its knots had knots and the texture was just as icky as you can imagine a flea market hair extension to feel like. HOWEVER:


I managed to make the above of the above-above! Here's how:

1) I washed the wig twice using shampoo. With second hand wigs you really want to get them clean! With tangled wigs its important to NOT rub it in but to squeeze the shampoo in little by little, section by section, to avoid tangling up the wig further. Rinsing should also follow the direction of the hair for the very same reason.

2) I let the wig soak overnight in a lotion bath. For this you can use any lotion you like, just see that it's definitely water-soluble. Add a handful of lotion to lukewarm water and stir/whip until it dissolves, super long wigs might need more. The wig has to be completely submerged in water and it's good if you can turn it a few times during the soak so that all sides get equal treatment.

3) I rinsed the wing a little but not too thoroughly, the lotion acts just like fabric softener bath would, making the ensuing brushing easier.

4) I pressed the wig between layers of towel and then left it to dry on top of it.


5) When it was dry it was brushing time! You'll want to avoid any brush that has a tendency of grabbing at hair, and preferably a flat shaped one instead of a cylindrical brush. Brushing should start at the ends and then you'll work your way upwards.

6) If there's knots that seem difficult, gently pull as much hair out of them as possible by tugging at the strands above the knot. Try to pry the knot apart into smaller knots and work each of them on their own. You may have to turn the wig/extension several times while you're doing this because once you get a layer brushed out you may find even more knots that were hiding underneath the initial layer...

7) Once the brushing is done is the time for styling if you want to do it. My own hair's straight so I just left it as is.

And then - trying-on time!


Whoah I've never had thick hair, this looked and felt amazing! :D


Hiding the top with a headdress that fits hilariously badly with the rest of my outfit. 


Side view.

So hey, a whole new hairpiece to my collection and it cost me 300kr, which is ~2€/2,70$. Add on the working hours and you'd get a whole larger price though, this took such a long time to fix that I'd easily add a zero and then double the price if I were to sell it. So yeah, sorting out a second hand wig is only for those who don't mind sitting in an uncomfortable position for hours, brushing out a seemingly never-ending mass of tangles... one day after my whole back wants me dead... -.-

Friday, 5 July 2013

Rainy day sweater and a hair tutorial.


Lastly here's the sweater in action. Like you see it's rather long - longer than I expected anyway, but that's all a huge plus.


Here's a better photo of both the collar in the back and my hairstyle. Again it's just three plaits attached to my head with pins + decoration. I made a quick tutorial of it for FB but let's put it here as well:


(Right click open in new tab for full size image.)